
Lewis
/photography portfolio

Restorations


Restoration 1
In this photo i removed the red eye. To do that I used the red eye tool located four squares. Then i right click on it to find the red eye tool. Then i zoomed in on to the eyes and left clicked on the red portion of the eye.


Restoration 3
First i used the horizontal marquee and cropped it around the picture leaving the borders out. Then i went to select at the top of the page then clicked inverse. Then i clicked on the paint brush and painted the border of the picture white. Then i got he cloning stamp then clicked on the alt key and clicked around the area that would be getting cloned. Then i dragged the cloning stamp over the area that was getting cloned. Then i clicked on layers the top and then went to color balance and adjusted the color to something that brought back the original colors.


Resortration 5
For this restoration i used Two tools. One of them was the patch tool located In the first column four rows down. To use this tool circle around any damaged area then left click and drag the circle to a similar undamaged area. Next i used the clone stamp tool located in the first column five rows down. To use this tool you press and hold alt and and click on the similar area of the damaged area. Once it has been cloned clicked the damaged area and it is fixed.


Restortion 7
In this resoration I not only did i have to fix the damage of the photo but i also had to change the color of the phot back to its orginal color. To fix the damage in this photo i used the clone stamp where i a had to click on an area that i wanted to clone and then clone it on to the damaged area. To change the color to black and white. I went to image then adjustments, and last hue and saturations. Then move the saturation all the way to the left.


Resortion 9
In this restoration I had to clone the missing part of the dress as well as the missing part of the floor. I did this using the clone stamp tool. I used the clone stamp to re do a part of her hair. I used the patch stamp tool to redo large portion of the wall.


Resoration 11
In this restoration there was many scratchy and missing lines in the Photo. A main alteration I had to make was fixing the middle girls eyes. To do this I used the clone tool and cloned one of the other eyes from the other girls. Then cloned it on to the girl with the damaged eye.


Restorastion 13


Restoration 2
I clicked on the Spot Healing brush tool located in the first row four icons down. Then I clicked on any area that had acne. I also used the zoom (command +) then made the brush smaller and fixed the smaller acne.


Resotration 4
In this photo i used the patch tool to clean up the lines on the photo that came with age. It is located four down and then you have to left click to bring it up. Then you circle whatever area is damaged. Then click and hold on it and move the selected area to a similar non damaged area. To change the sharpness i went to filters at the top. Then i went to sharpen and clicked unsharp mask and adjust it to something i like. To change the color go to images at the top of the photo then go to adjustments. Ten click on color balance and adjust colors to your desire.


Restoration 6
In this resorations i had to use many tools that i had already used prevously. The new editing tools i used was changing the brightness/contrast. To do this i clicked on image tab at the top then i clicked on adjustments then clicked on brightness/contrast Then you adjust it the tabs how you like then click OK.
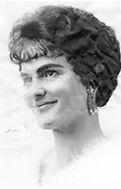
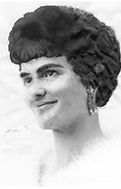
Restoration 8
For this restoration I worked on fixing multiple parts facing to do this I used the clone stamp tool to clone the eye ball as well as the eyebrows that had disappeared because of the age. I also darkened the hair by changing the hue and saturation. Then used the spot healing brush tool to blend the hair together.

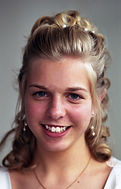
Restorion 10
In this restoration I had to fix the girls acne as well as her teeth. To remove the acne I used the spot healing brush tool. Then I used the quick select tool on the teeth. After I selected each tooth individually I then I changed the lightness in the hue and saturation section under adjustments.

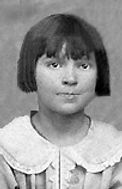
Restorastion 12
For this restoration I had to fix a lot of the background damage. to do that I used the clone stamp tool so that I didn't loose the texture of the background. I also used the clone stamp tool to fix the hair damage as well as her damage in her face with out loosing the texture of her hair and skin.
In this restoration I had to use the clone stamp a lot. I used it to recreate the soldiers whole right arm. I also changed the hue and saturation to make the picture more black and white instead of the yellowish color it was.

Resoration 14


Resorastion 15
In this restoration I had to recreate the whole border of the pictures as well as the missing chunks of the background. To do this I used the clone stamp tool to keep the texture of the background. Then to do the border I sectioned off just the border and painted it white.

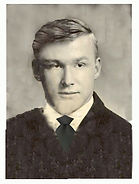
Restoration 17
In this picture there was a lot of damage do to age and water. I used the clone stamp to help fix most of the damage. I also went online and got a black tie to replace his that has faded away. To fix the other side of his jacket I copied the undamaged side and flipped it and put it onto the opposite side.

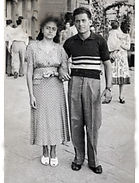
Resoration 19
In This restoration there wasn't much to change in the photo. I selected the border and colored it in as a white border. Then I used the clone stamp tool to fix the bricks on the ground. After that I fix the yellow damage in the background with the clone stamp tool ass well.
To do this restoration I first had to fix the mouth which had been badly damaged. To do this I used both the clone stamp tool as well as the spot healing brush to blend in the changed I made. To do the background and hair damage I used the patch tool.


Restoration 16
In this restoration there was a lot of border damage as well as yellowing all over the picture. Much of the photo was discolored and damaged. To fix the border I made a selection on just the border and then painted it white. To fix up all the damage I cloned the good parts of the photo and put it where the photo is damaged.


Restorstion 18
I am a beginning student and to start this restoration I first had to use the polygonal lasso tool and rotate the photo to its correct orientation. Then I used the crop tool to crop the photo and keep the necessary information. Next i used the clone stamp tool too put information in the black and damage areas. Then i used the rectangular marquee tool and selected around the photo. Then I inverse selected it and colored in it with a white border.


Restoration 20
In this photo there is not many damages besides the creases that were put into the photo. To fix those damages we had to use the clone stamp tool with the brush size really small. In order to not damage the writing we had to make numerous of really small changes.